|
ChemLab 2.4 - User Guide and FAQ
Screenshots - More Details
Getting Started
When ChemLab is started or a new file is created the simulation dialog box will open. From this dialog box pick a simulation module to load. This will load the text window with the instructions necessary to perform the lab. Read the lab introduction in the introduction text window. The introduction will explain the basic science behind the lab. After reading the lab introduction read the procedure. To select the procedure click the procedure tab above the text window. In the procedure you will find the basic steps to complete the lab, you should first read the procedure completely before attempting the lab. If you are not sure how to perform a certain action check the lab manual or help for directions. Then perform the lab following the steps in the procedure. While performing the procedure you can record your observations in the observation text window, these will be saved in the ChemLab file.
The Organization of ChemLab
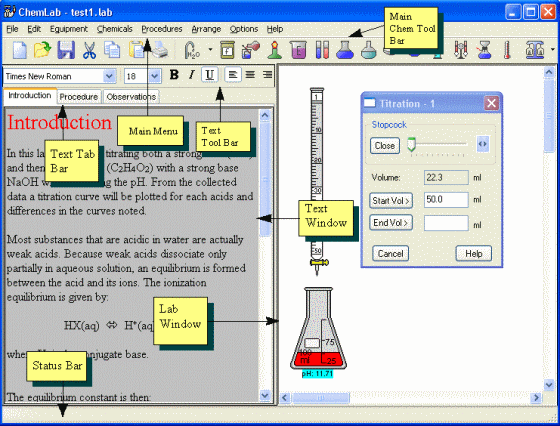
ChemLab consists of two windows, a text and lab window, divided by a splitter bar. The lab window displays the animated lab simulation. Objects in the form of lab equipment are added to this window. These objects can be added and acted upon by using the Chem toolbar or the main menu commands.
The text window serves as the center for textual documentation in ChemLab. It is divided into three panes: a read-only Introduction pane, a read-only Procedure pane, and a user writeable Observation pane. These panes are selected by clicking on the text tab bar, located just above the text window.
The Observation pane allows the user to perform paragraph and character level formatting. These formatting options can be selected using either the text Toolbar, located just above the text window, or by using the text edit menu commands found in the edit main menu.

Frequently Asked Questions - ChemLab
- Q: What is the difference between Model ChemLab Professional and Standard editions?
A: Model ChemLab Pro includes the Lab Wizard tool which enables instructors to run, edit, and create lab simulations while the Standard edition enables students only to run lab simulations.
- Q: What's the difference between a UDL and a DLL simulation file?
A: There are two types of lab simulation files: a) User-Defined Lab (UDL) files with a *.udl extension can be created and edited by users with a Lab Wizard tool (available with Pro edition only), and b) pre-programmed simulation plug-ins with a *.dll extension that cannot be created or edited by users but are supplied with Model ChemLab.
- Q: What is the Lab Wizard?
A: The Lab Wizard is a Model ChemLab tool used to design chemistry lab simulations (available with Pro edition only). Although ChemLab comes with a variety of lab modules, you need not limit your work to these pre-fabricated experiments. The Lab Wizard will translate your experiments into ChemLab modules called User Defined Labs (UDL's) by asking you to supply it with documentation, chemical data and reaction formulas.
- Q: What lab simulations are included with Model ChemLab?
A: Model ChemLab comes with a range of pre-designed lab experiments for general chemistry at the high school and college level. Users can expand upon the original lab set using ChemLab's LabWizard development tools, thus allowing for curriculum specific lab simulation development by educators. These user designed simulations combine both text based instructions and the simulation into a single distributable file.
- Q: Is Model ChemLab suitable for distance learning?
A: Yes. Model ChemLab is used for distance learning, virtual schools and home schooling.
- Q: How can I get a printout of the lab Introduction and Procedures?
A: There are print options settings for selecting which documents are printed. Goto the Options menu and select from the printer options the documents you wish to print, prior to printing. The default is to print the observations and lab window.
- Q: Why can't I get the beaker to pour?
A: Pouring and decanting involve selecting a piece of lab equipment, positioning its left side over the receiving container and selecting the decant button from toolbar or decant/pour menu item from the procedures menu or from the right-mouse-button context menu. If the pouring object is not directly over the receiving object, the contents will be suspended. Note: liquid is transferred first in this process to allow separation.
Screenshots - More Details
|


 Download Site 1
 Buy Now $29.99