 How to burn IMG to DVD with IMG to DVD burner? How to burn IMG to DVD with IMG to DVD burner?
This is a very simple guide to burning either a DVD-Img
or a DVD folder with DVDSanta. You do not have to have created
it with DVDSanta to burn it.
Introduction &
Requirements
DVDSanta
- This is a fully functional demo of DVDSanta, it will never
expire, but will leave a watermark on your video if you
do any video processing with it. To get full use of this
program without a watermark you will have to purchase a
serial for it.
How to burn
IMG to DVD with IMG to DVD burner?
step 1: Download DVDSanta,
and run it.
Step 2: Start Burning
There are five main buttons on the DVDSanta main window.
They are Video Files to DVD, Photo Slideshow to DVD, Digital
Camcorder Direct to DVD, Disc Image or DVD Video Folder
to DVD and Buy now. Click the Disc Image or DVD Video Folder
to DVD button.

Step 3: Burn A DVD Folder
To burn
a folder you have to use the file browser that pops up to
select the Video_TS.ifo file in the DVD folder. After you
select it and click open, the DVD writing tool will launch.

Step 4: Burn A DVD Folder - DVD Writing Tool
Your
DVD folder is selected as the source and cannot be changed
now. Disc Label can be changed to whatever you want. The
Data Size bar will show how much of the disc your DVD is
going to take up (trust me, your compilation will look a
lot bigger than mine). Destination alows you to select which
DVD burner you wish to use to burn your DVD. Burn proof
is best left selected. Choose whichever Write speed you
wish, generally slower speeds take long but are more safer.
Number of copies is entirely up to you. Now you can click
the Burn! button, or if you'd prefer you can have a Test
write first.

Step 5: Burn a DVD-Img
After you click the Disc Image or DVD Video Folder to DVD
button, you will see a file browser looking for a DVD folder
or an ISO  image file.
Select an ISO image and click open, the the DVD writing
tools will pop up. image file.
Select an ISO image and click open, the the DVD writing
tools will pop up.
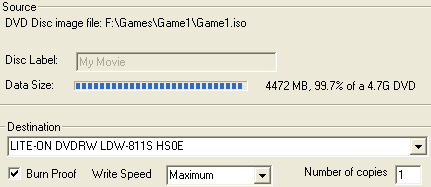
Step6: Burn a DVD-Img - DVD Writing Tool
Your
ISO file is selected as the source and cannot be changed
now. Disc Label cant be changed, the Disc label will be
in the ISO file. The Data Size bar will show how much of
the disc your DVD is going to take up. Destination alows
you to select which DVD burner you wish to use to burn your
DVD. Burn proof is best left selected. Choose whichever
Write speed you wish, generally slower speeds take long
but are more safer. Number of copies is entirely up to you.
Now you can click the Burn! button, or if you'd prefer you
can have a Test write first.

Related
Software Step by Step Guides and Tutorials:
How to convert DVD to PSP MP4 step by step?
How to convert DVD to iPhone Video MP4 step by step?
How to convert and burn VOB AVI to DVD step by step?
How to copy DVD and play on PSP step by step?
How to play DVD movie on my PC step by step?
How to rip DVD and put DVD on Zune step by step?
How to copy DVD9 to DVD5/DVD9, burn DVD9 to DVD5/DVD9?
How to transfer photo to DVD, create slide show on DVD?
|

 RSS Feeds
BBS Forum

 RSS Feeds
BBS Forum
