 How to capture screen in singles or batches from video on Mac? How to capture screen in singles or batches from video on Mac?
To capture screen from videos on Mac, we recommend Xilisoft
Video Snapshot for Mac, Xilisoft Video Snapshot for Mac
is a excellent video to picture software to batch extract
images from videos, such as MPEG, DivX, Xvid, AVI, RM, MP4,
M4V, MOV, WMV etc, and output them as static pictures, GIF
animation, Flash, and even HTML.
This step-by-step tutorial will show you how to capture
pictures in singles or batches from various video files
on your Mac. Firstly, please download and install Video
Snapshot for Mac, then follow the steps below
to accomplish video picture capture tasks.
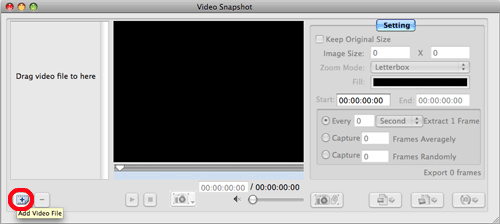
Step1. Load video files
Run Xilisoft Video Snapshot for Mac, click the Add
Video File button (plus sign) in the left bottom
to add video files, or just drag video files to the file
list. If you want to delete the video file loaded, choose
the video file and click the Remove From List
button (minus sign) to remove the selected video file.
Step2. Adjust output settings
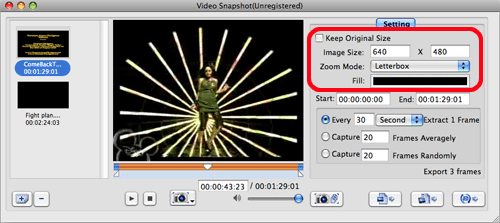
If you want to keep the original image size, just jump
to Step 3. Otherwise, uncheck the Keep
Original Size checkbox, and enter the image size
you want, set the zoom mode and choose the fill color.
Step3. Capture pictures
The software provides two methods for capturing pictures:
single capture and batch capture.
1. Single capture
The software offers three options to capture single frame:
Capture to Picture List, Capture from Frame Window, Direct
Export.
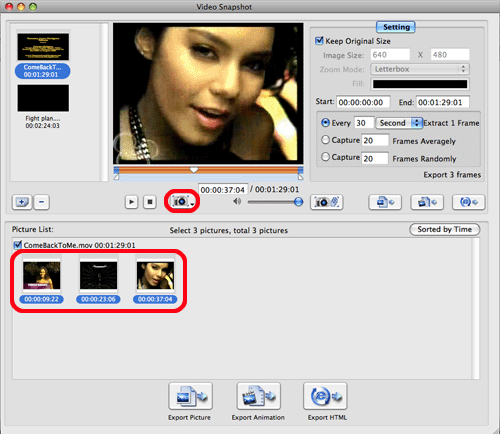
Choose the video file you want, click the play button
below the built-in player to play the video. When it comes
to the frame you like, long press the capture button below
the player, and choose the picture capture way you want.
The way you choose will be the default one when you short
press the button to capture picture next time.
If you choose Capture to Picture List,
then the captured picture will be displayed in the picture
list for your preview and export.
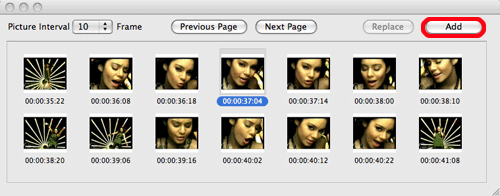
If you choose Capture from Frame Window,
then the frame window will pop up, the current frame will
be highlighted by default. Click the Add
button to add the frame to the picture list. If you're not
satisfied with the frame, then choose the best picture you
want from the frame list and add it to the picture list.
Set Picture Interval and click Previous
Page or Next Page button to browse
more frames.
If you choose Direct Export, then a dialog
box pops up to let you rename the picture and choose the
output folder to save it directly.

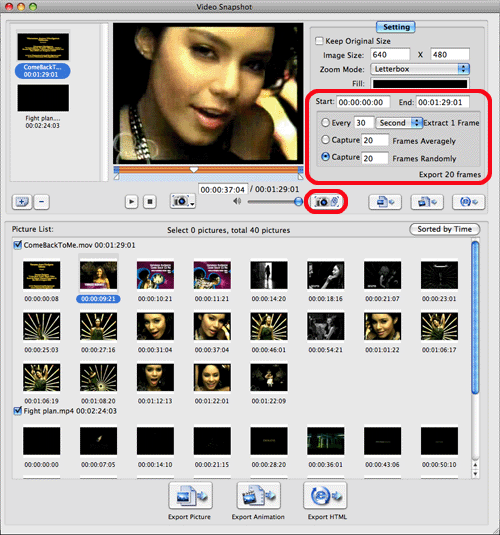
2. Batch capture
If you want to batch capture pictures and output them
directly in one step, jump to Step 4.
Firstly, set the batch capture way on the right panel:
averagely by time, averagely by frame numbers, randomly
by frame numbers. After setting the capture way, enter the
seconds, minutes, hours or frames as the capture interval,
or enter the target frame numbers. Moreover, you can enter
the start time and end time on the right panel to set the
segment for batch capture.
Secondly, click the Batch Capture Pictures
button to start capturing pictures, then the captured pictures
will be displayed in the picture list.
Step4. Output captured pictures
There're three ways to output pictures: direct export single
frame, direct export frames in batches and export from the
picture list.
1. Direct export single frame
Long press the button below the player, and choose Direct
Export to export the current frame directly. Or
you can drag the current frame from the player to local
directly for saving.
2. Direct export frames in batches
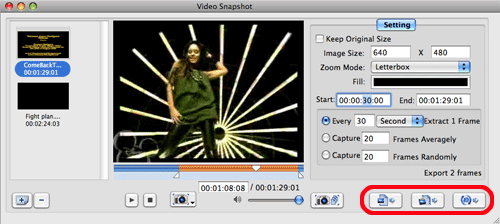
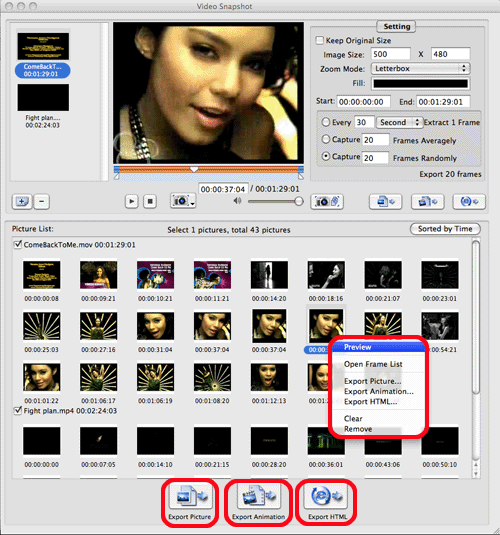
The three buttons at the right bottom of the main interface
are respectively Export Picture, Export
Animation and Export HTML. You
can use the three buttons to export captured pictures directly.
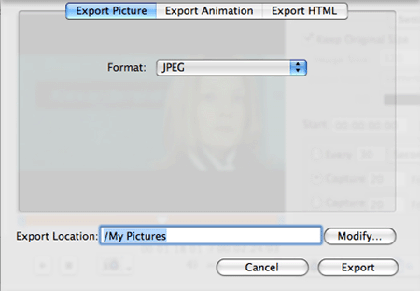
Choose the video file to capture picture, and set the batch
capture way, then click the Export Picture
button (the first button) at the right panel to open "Export
Picture" dialog, then set "Picture Format"
and "Export Location" option to export the captured
pictures directly.
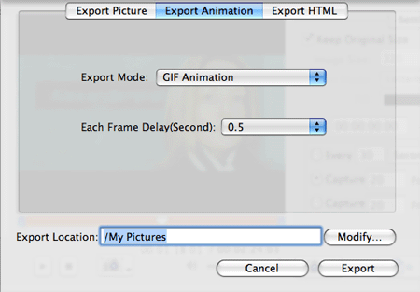
Or click Export Animation button (the
second one) to open "Export Animation" dialog,
set the "Export Mode", "Each Frame Delay
(Second)" and "Export Location" option to
export captured pictures as animation.
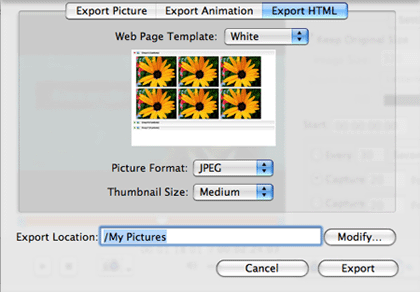
Or click Export HTML button (the third
one) to open "Export HTML" dialog, set the "Web
Page Template", "Picture Format", "Thumbnail
Size" and "Export Location" option to output
them as HTML webpage.
3. Export pictures from picture list
Before exporting pictures, you can preview the pictures
in the picture list by right-click. If you're not happy
with the picture you capture, right click the picture and
select Open Frame List to enter the frame
window, and choose your favorred one to replace the selected
one. Or choose Clear or Delete
to clear all the pictures or delete the selected pictures
in the picture list.
Click the "Export Picture", "Export Animation"
or "Export HTML" button at the bottom to export
all the pictures in the picture list. If you only want to
export certain pictures, choose the pictures you want to
export and open the right-click menu, and choose "Export
Picture…", "Export Animation…" or "Export
HTML…" option to export the selected pictures in your
way.
Related
Software Step by Step Guides and Tutorials:
How to capture or record digital audio?
How
to capture screen, make video guide with Screen Capture?
How to rip/convert DVD to 3GP2 M4A OGG AC3 AAC RA AU etc. on Mac?
How to save/download/capture/rip/record RTSP streams?
How to capture or convert DVD movie to Bitmaps(bmp) image step by step?
How to capture/record Youtube Video?
How to capture Streaming Windows Media Video Clips?
How
to capture SWF Flash Files from Webpages with Infine Capture
Flash?
How to record Orb Video Streams?
How to capture/download Podcasts?
| 
 RSS Feeds
BBS Forum

 RSS Feeds
BBS Forum
