 How to transfer miniDV tapes to DVD video format step by step? How to transfer miniDV tapes to DVD video format step by step?
dvdSanta can transfer miniDV tapes to DVD video format, which means, you don't have to prepare a Huge hard disk space to dump your DV tapes first, then encode the video to DVD video format later. (Do you know? a 10 minute DV video can eat up 2-3GB of your hard disk space. Using dvdSanta can save you a lot of time and disk space.)
Here are the things needed for this job:
- a miniDV Camcorder.
- a PC with IEEE 1394 (Firewire) port, running Windows 2000 or Windows XP. In order to do the real-time DVD conversion, you PC should be Fast Enough, which means the PC should have at least a Pentium 4 2.0GHz or faster CPU, at least 256MB RAM, and at least 5GB free hard disk space.
- an IEEE 1394 cable.
- dvdSanta
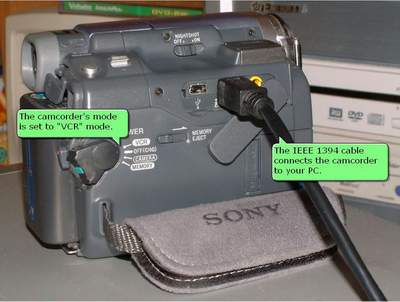
Step1. Connect an IEEE 1394 (Firewire) cable to miniDV Camcorder.
Connect an IEEE 1394 (Firewire) cable to your miniDV camcorder. Turn on your camcorder and switch the mode to VCR mode.
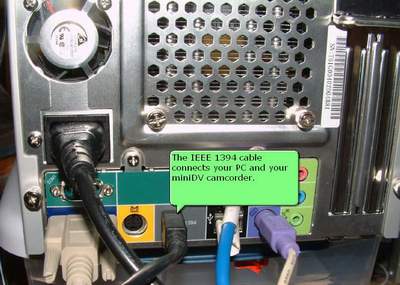
Step2. Connect the IEEE 1394 (Firewire) cable to your PC's IEEE1394 port.
Connect the other end of the IEEE 1394 (Firewire) cable to your PC's IEEE 1394 port. (If your PC does not have IEEE 1394 port, you will need to purchase and install an IEEE 1394 card on your PC.)
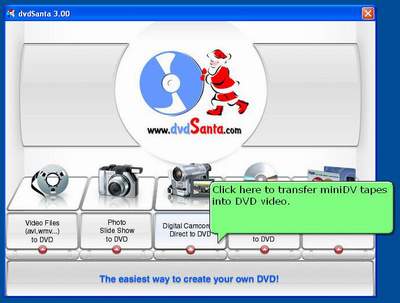
Step3. Run dvdSanta and burn the DVD.
Run dvdSanta, click the "Digital Camcorder Direct to DVD" button
Use the buttons on the left side to control your camcorder. You can play, stop, rewind your tape. If you want to transfer a whole tape, click the "Rewind" button to rewind the tape to its beginning.
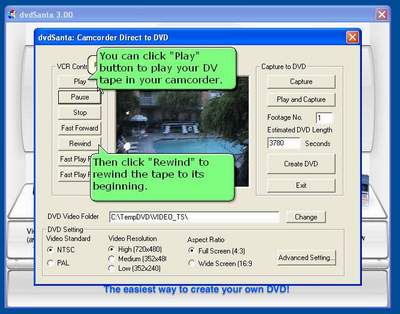
Then, click "Play and Capture" button to start transferring the miniDV tape into DVD video.
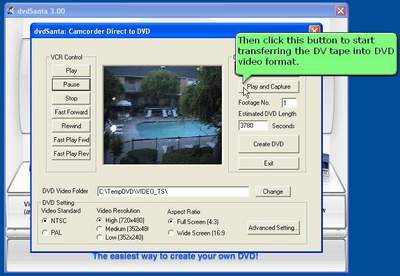
Now the transferring begins. Wait until it ends. If you want to stop in the middle, click the cancel button. After the transferring completes, click "Create DVD" button to burn your DVD video.
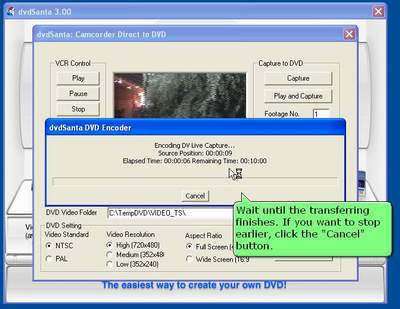
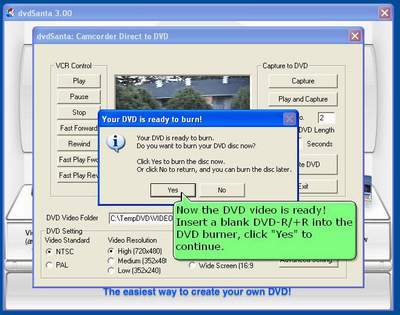
dvdSanta has done preparing the DVD video, now it's time to burn your disc.
Before you burn the disc, you can use a software DVD player such as PowerDVD to examine the DVD video created by dvdSanta. The DVD video is stored under c:\TempDVD\VIDEO_TS folder.
Now you can insert a blanc DVD-R/+R disc in your DVD burner now and click "Yes" to continue.
If you want to burn this DVD disc later, you can click "No" button now and quit dvdSanta. The DVD video is stored under C:\TempDVD\VIDEO_TS folder. You can burn it later using dvdSanta and follow "How to Copy a 4.7GB Single Layer DVD movie".
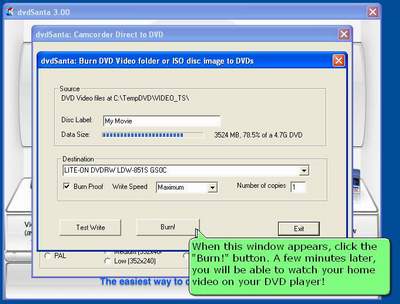
If you are a using DVD+R/RW disc, just click "Burn!" and wait dvdSanta finish the burning job. If you are using a DVD-R/RW disc, you should select burning speed to 1x,2x,or 4x, then click the "Burn!" button to burn the disc.
Related
Software Step by Step Guides and Tutorials:
How to burn ISO to CD/DVD with ISO to CD/DVD burner software?
How to brun/convert rm to DVD, rmvb to DVD?
How to copy DVD movies with dvdSanta step by step?
How to burn MPEG file to DVD Movie step by step?
How to create or make your own personalized DVD menu with ConvertXtoDVD?
How to burn camera videos like M2TS/M2T/MTS to Blu-ray?
How to burn Tivo videos to DVD with Tivo to DVD burner
How to convert XviD to DVD, WMV to DVD step by step?
How to convert and burn VOB AVI to DVD step by step?
How to convert FLAC to MP3 with FLAC to MP3 converter?
How to burn DVD movie from AVI MPEG DivX rmvb Mov etc.?
|

 RSS Feeds
BBS Forum

 RSS Feeds
BBS Forum
